Difference between revisions of "Evaluation"
m (Better) |
m (→Other patterns: -Hence) |
||
| (49 intermediate revisions by the same user not shown) | |||
| Line 1: | Line 1: | ||
| − | {{Top | + | <noinclude>{{Top |
|author1=[[User:Mikael Häggström|Mikael Häggström]] | |author1=[[User:Mikael Häggström|Mikael Häggström]] | ||
|author2= | |author2= | ||
| − | }} | + | }}</noinclude> |
| + | First, confirm that the '''identity''' of the sample evaluated is the same as that of the requisition form and/or other medical history. | ||
==Microscopy settings== | ==Microscopy settings== | ||
[[File:Parts of a light microscope (english) - larger text.png|thumb|300px|Usual parts of a microscope.]] | [[File:Parts of a light microscope (english) - larger text.png|thumb|300px|Usual parts of a microscope.]] | ||
| Line 16: | Line 17: | ||
#Switch to low magnification, and focus using the eye piece adjustment.</noinclude> | #Switch to low magnification, and focus using the eye piece adjustment.</noinclude> | ||
If there's a '''constant visual artifact''', even after you've cleaned the eye piece and objective lenses with lens tissue, try raising or lowering the condenser if you can, and the artifact may disappear out of focus. | If there's a '''constant visual artifact''', even after you've cleaned the eye piece and objective lenses with lens tissue, try raising or lowering the condenser if you can, and the artifact may disappear out of focus. | ||
| + | |||
| + | ==Priority== | ||
| + | Whenever you have more than one case, generally have an '''initial look''' at the requisition form and/or in the microscope at the most likely relevant area of each case, and prioritize the case(s) that likely need to be done first. Indications to prioritize case(s) are mainly: | ||
| + | * '''Clinical management''' of the patient highly benefits from a fast diagnosis. | ||
| + | * Being '''marked''' as a rush case. | ||
| + | * There's a significant probability that it will require '''further workup''' such as [[immunohistochemistry]], especially when there is an impending deadline for ordering it. | ||
| + | * The optimal person to ask for '''advice''' may not be available later. {{Further|Consultation}} | ||
| + | As part of initial triaging, also determine what tasks can be '''delegated'' to juniors or pathologist assistants. | ||
| + | |||
| + | For a pile of many cases of relatively low risk of a need to prioritize any one over another, such as [[gastrointestinal biopsies]], a very quick glance at the forms and/or a naked eye look at the glass slides is generally sufficient. | ||
==Main steps== | ==Main steps== | ||
*Preferably, look up past '''medical history''' of the patient, mainly past cancers that could possibly appear in the current specimen. | *Preferably, look up past '''medical history''' of the patient, mainly past cancers that could possibly appear in the current specimen. | ||
*Try to pick up glass slides '''without touching''' the tissue area, as fingerprints may interfere with the evaluation. | *Try to pick up glass slides '''without touching''' the tissue area, as fingerprints may interfere with the evaluation. | ||
| − | *Look at each microscopy slide by plain '''eye''', to plan the microscopy | + | *Look at each microscopy slide by plain '''eye''', to plan the microscopy scanning so as to not miss peripheral fragments. |
| − | *Have a '''systematic direction''' of | + | *Have a '''systematic direction''' of scanning through microscopy slides, such as from top left to bottom right as seen in the microscope. When the microscope makes what you see two-way mirrored, the starting position is with the objective pointing at the bottom right of the glass slide. You may center on findings on interest and evaluate them at higher magnification, and then resume the scanning |
<gallery mode=packed heights=140px> | <gallery mode=packed heights=140px> | ||
File:Position of objective (edited).jpg|Example starting position of objective. | File:Position of objective (edited).jpg|Example starting position of objective. | ||
| − | File:Microscopy slide scanning.jpg|Example slide scanning | + | File:Microscopy slide scanning.jpg|Example slide scanning movement. |
</gallery> | </gallery> | ||
| − | *Look in particular for whatever is '''requested''' or '''suspected''' on the requisition form or equivalent. | + | <gallery mode=packed heights=170px> |
| − | + | File:Screening method 1.jpg|Starting at top left in the view, aim to scan a strip that trajects a circular field of view approximately at the clock positions shown... | |
| − | + | File:Screening method 2.jpg|...When reaching the end of relevant material, set your eyes on any object at the edge of the strip that you just scanned... | |
| − | + | File:Screening method 3.jpg|...Move the field of view over so that the object is seen on the opposite side. The new strip to be scanned will now be juxtaposed to the one you previously scanned. | |
| − | '''Complete''' | + | </gallery> |
| + | This scanning technique above makes sure that you don't miss any area, and also minimizes redundant scanning. The width or clock position that you scan in each field of view is not exact, as you may scan up to the entire width in cases where you think relevant findings will clearly present themselves even if only partially showing in the periphery of your view. | ||
| + | *Look in particular for whatever is '''requested''' or '''suspected''' on the requisition form or equivalent. For each type of condition, initially you will generally focus relatively more on high magnification features with high specificity, but you should still have a habit of looking at '''low magnification''' as well to get an idea of its pattern. In time, you will increasingly correlate diseases and conditions with their overall low magnification patterns - patterns that may require 1000 words to describe and thus cannot conveniently be part of written criteria, but will nevertheless allow you to make quicker and more accurate diagnoses, or at least clues thereof. | ||
| + | *When you find something suspicious, it is helpful at least in the beginning to evaluate them systematically by a '''low-to-high magnification approach''' (example below showing a [[basal-cell carcinoma]]): | ||
| + | <gallery mode=packed heights=180px>> | ||
| + | File:Systematic microscopy 2 - Orientation.jpg|'''Orientation''' (lowest magnification): In this case oriented by the skin surface (green). A lesion is seen (red) and its demarcation can be discerned (diffuse in this case) | ||
| + | File:Systematic microscopy 3 - Architectural pattern.jpg|'''Architectural pattern''' of any suspicious cells, in this case nests of cells (an overview of patterns will be given later in this chapter), as well as components of the intervening stroma. | ||
| + | File:Systematic microscopy 4 - Cellular arrangement.jpg|'''Cellular arrangement''', including crowding and polarity (common tendencies among cells at the border, such as positions of nuclei within cells, cell elongation or "palisading" in this case). Amount of mitoses can also be appreciated at this level. | ||
| + | File:Systematic microscopy 5 - Subcellular features.jpg|'''Subcellular features''' (may need highest magnification) | ||
| + | </gallery> | ||
| + | *'''Complete''' the scanning even if you encounter a finding, as there may be additional findings as well. It is usually helpful to Google multiple images of the normal histology of the location you are looking at, and compare those to what you see, and focus on whatever features may deviate from the normal. | ||
==General patterns== | ==General patterns== | ||
| Line 41: | Line 62: | ||
File:Encapsulated Papillary Carcinoma of the Breast, H&E (15768688957).jpg|'''Papillary''': Protuberances of epithelioid cells around fibrovascular cores. | File:Encapsulated Papillary Carcinoma of the Breast, H&E (15768688957).jpg|'''Papillary''': Protuberances of epithelioid cells around fibrovascular cores. | ||
File:Micropapillary urothelial carcinoma, very high mag.jpg|'''Micropapillary''': Papillary tufts without fibrovascular cores | File:Micropapillary urothelial carcinoma, very high mag.jpg|'''Micropapillary''': Papillary tufts without fibrovascular cores | ||
| − | File:Histopathology of fascicular growth in a leiomyoma.jpg|thumb|'''Fascicular''': Generally the same cell type throughout, but some form band-like groups are aligned in the same direction. | + | File:Histopathology of fascicular growth in a leiomyoma.jpg|thumb|'''Fascicular''': Generally the same cell type throughout, but some form band-like groups that are aligned in the same direction. |
| − | File:Micrograph of prostate cancer with Gleason score 10 (5+5) with solid sheets of cells (crop).jpg|'''Solid''': More or less the same cell type throughout, with no spaces between, and no other particular pattern. | + | File:Histopathology of woven or storiform pattern.jpg|'''Woven''' or '''storiform''': Elongated cells or nuclei wherein small bundles are aligned in an otherwise haphazard pattern. |
| + | File:Micrograph of prostate cancer with Gleason score 10 (5+5) with solid sheets of cells (crop).jpg|'''Solid''' or "'''sheets'''": More or less the same cell type throughout, with no spaces between, and no other particular pattern. | ||
File:Papillary urothelial carcinoma with cribriform morphology, very high mag.jpg|'''Cribriform''': Solid with multiple clear spaces. | File:Papillary urothelial carcinoma with cribriform morphology, very high mag.jpg|'''Cribriform''': Solid with multiple clear spaces. | ||
| − | File: | + | File:Bovine Bone Sample and 430 times Magnification.jpg|'''Whorled''': Multiple concentric objects, or spiral-shaped |
| + | File:Histopathology of cartwheel pattern in dermatofibrosarcoma protuberans, annotated.jpg|'''Cartwheel pattern''': Center points that radiate cells or connective tissue outward | ||
</gallery> | </gallery> | ||
| Line 61: | Line 84: | ||
File:Heterochromatic versus euchromatic nuclei.jpg|Sometimes "heterochromatic" versus "euchromatic" nuclei are used, but this strictly refers to the molecular structure of DNA, so you may simply use fine versus coarse. | File:Heterochromatic versus euchromatic nuclei.jpg|Sometimes "heterochromatic" versus "euchromatic" nuclei are used, but this strictly refers to the molecular structure of DNA, so you may simply use fine versus coarse. | ||
File:Well-differentiated neuroendocrine tumor with salt-and-pepper chromatin.png|Granular "salt-and-pepper" chromatin. | File:Well-differentiated neuroendocrine tumor with salt-and-pepper chromatin.png|Granular "salt-and-pepper" chromatin. | ||
| + | </gallery> | ||
| + | ;Patterns of nuclear disintegration: | ||
| + | <gallery mode=packed heights=250> | ||
| + | File:Nuclear changes.jpg | ||
</gallery> | </gallery> | ||
| Line 67: | Line 94: | ||
File:Histology of deep zone of articular cartilage.jpg|'''Hyaline''' usually refers to extracellular material that stains homogeneously pink on H&E stain (like the matrix of hyaline cartilage, pictured). | File:Histology of deep zone of articular cartilage.jpg|'''Hyaline''' usually refers to extracellular material that stains homogeneously pink on H&E stain (like the matrix of hyaline cartilage, pictured). | ||
File:Histopathology of hyaline membranes in diffuse alveolar damage.jpg|Example of hyaline material (in alveoli of lungs, indicating diffuse alveolar damage) | File:Histopathology of hyaline membranes in diffuse alveolar damage.jpg|Example of hyaline material (in alveoli of lungs, indicating diffuse alveolar damage) | ||
| + | File:Glass for pathologist.png|This is what pathologists also refer to as "glassy" (because hyaline cartilage looks like glass grossly). | ||
</gallery> | </gallery> | ||
| Line 74: | Line 102: | ||
File:Histopathology of mucosal plasma cell infiltrate in chronic gastritis.jpg|'''Plasma cells''' and '''lymphocytes''' generally confers a diagnosis of '''chronic inflammation''' if present in increased amount for the location. | File:Histopathology of mucosal plasma cell infiltrate in chronic gastritis.jpg|'''Plasma cells''' and '''lymphocytes''' generally confers a diagnosis of '''chronic inflammation''' if present in increased amount for the location. | ||
File:Histopathology of intravascular neutrophils.jpg|However, disregard intravascular white blood cells. | File:Histopathology of intravascular neutrophils.jpg|However, disregard intravascular white blood cells. | ||
| + | </gallery> | ||
| + | |||
| + | ==Marking slides== | ||
| + | <gallery mode=packed heights=140> | ||
| + | File:Photograph of marking a microscopy slide.jpg|To mark a microscopy slide, use an objective that gives you enough space underneath. Rest a finger on the stage, while holding the marker pen relatively close to its tip. Move the tip of the marker pen into the field of view but at least a few millimeters from the slide... | ||
| + | File:Micrograph of marking a microscopy slide.jpg|...Then slowly approach the slide while making sure that the tip remains in the location you want to mark. Be careful not to obscure findings of interest with the mark. If the slide is likely to undergo whole slide imaging, make the mark on the back and not on the coverslip (as it reduces the risk of erroneous focusing of the cameras). | ||
| + | File:Wiping a slide.png|You can generally remove marks from a microscopy slide by using alcohol. Hold the cover slip in place with two fingers while wiping from side to side, to avoid the risk of moving the coverslip. Don't press hard against the glass, as it may disrupt the tissue. | ||
</gallery> | </gallery> | ||
| Line 79: | Line 114: | ||
<gallery mode=packed heights=220> | <gallery mode=packed heights=220> | ||
File:Measurement using transparent ruler in microscopy.jpg|You can use a regular transparent ruler for most purposes, since it is rarely necessary to specify distances as more exact than millimeters. It works best on low magnification. | File:Measurement using transparent ruler in microscopy.jpg|You can use a regular transparent ruler for most purposes, since it is rarely necessary to specify distances as more exact than millimeters. It works best on low magnification. | ||
| − | File:Measurement of tumor size on two microscopy slides.jpg|Alternatively, | + | File:Measurement of tumor size on two microscopy slides.jpg|Alternatively, mark the limits under microscopy, and then use a regular ruler to measure the dimensions. This works even if the distance exceeds the field of view, or spans more than one slide. |
| − | File:Calibration slide with rulers and grids.jpg| | + | File:Calibration slide with rulers and grids.jpg|Rarely, sub-millimeter measurement is needed, in which case you may use a calibration slide, which is basically a translucent ruler with 0.1 mm line resolution or smaller, which may cost about $15 if none of your colleagues has one to lend, or the department can't provide one for you. |
File:Measuring distance on a microscopy slide using a calibration slide.jpg|To measure distance with a calibration slide, put it on top of the tissue slide and switch focus between the two. | File:Measuring distance on a microscopy slide using a calibration slide.jpg|To measure distance with a calibration slide, put it on top of the tissue slide and switch focus between the two. | ||
</gallery> | </gallery> | ||
| − | There are also eye pieces that show a ruler in the field of view, but make sure you match it with the correct objective and other settings to make the measurement valid. | + | There are also eye pieces that show a ruler in the field of view, but make sure you match it with the correct objective and other settings to make the measurement valid. A calibration slide is more robust because of such sources of error. |
==Counts per mm<sup>2</sup>== | ==Counts per mm<sup>2</sup>== | ||
There are multiple situations where a finding will be quantified in terms of amount per mm<sup>2</sup>. To make such calculations, you need to know the size of the area you see in the microscope. It is usually possible to look up what theoretically would be the area, but the most reliable way of knowing is to use a calibration slide to measure the diameter of your view. The area is then calculated as: | There are multiple situations where a finding will be quantified in terms of amount per mm<sup>2</sup>. To make such calculations, you need to know the size of the area you see in the microscope. It is usually possible to look up what theoretically would be the area, but the most reliable way of knowing is to use a calibration slide to measure the diameter of your view. The area is then calculated as: | ||
| − | *Area in mm<sup>2</sup> ≈ (diameter in mm | + | *Area in mm<sup>2</sup> ≈ (diameter in mm<sup>2</sup>) x 0.79 |
<gallery mode=packed heights=220> | <gallery mode=packed heights=220> | ||
| − | File:Micrograph of a calibration slide, showing the diameter of the field of view.jpg|Micrograph of a calibration slide, showing the diameter of the field of view | + | File:Micrograph of a calibration slide, showing the diameter of the field of view.jpg|Micrograph of a calibration slide, showing the diameter of the field of view. |
</gallery> | </gallery> | ||
| + | On the imaged example, each square is 0.05 mm wide, and each line represents 0.01 mm, making the diameter of the field of view 0.55 mm in this case. Thus, you can calculate the area in mm<sup>2</sup> by Googling: | ||
| + | :0.55 x 0.55 x 0.79 | ||
| + | :(equals approximately 0.24 mm<sup>2</sup>). | ||
| − | Sometimes "high power field" (HPF) is used for area, but it has a substantially different area for different microscopes, for example: | + | Generally count at least 10 fields of a high power view (or more if specifically instructed). You can keep the count in your head by repeating the total count and the order of the area you are looking at, such as: |
| + | *"Zero (instances) of one (field of view)" | ||
| + | *"One of two (as you see one instance as you've moved to the second field of view)" | ||
| + | *"Two of two" etc. | ||
| + | Subsequently, the '''count per mm<sup>2</sup>''' is calculated as follows: | ||
| + | {| | ||
| + | |rowspan=2| Count per mm<sup>2</sup> = ||align=center| Total count | ||
| + | |- | ||
| + | | <span style="text-decoration: overline">Number of fields x Area per field (in mm</span><sup>2</sup>) | ||
| + | |} | ||
| + | |||
| + | For example, if you reached "15 of 10", and the area of your field is 0.2 mm</span><sup>2</sup>, the count per mm<sup>2</sup> can be calculated by Googling: | ||
| + | :15/10/0.2 | ||
| + | := 7.5 | ||
| + | |||
| + | Sometimes '''"high power field"''' (HPF) is used for area, but it has a substantially different area for different microscopes, for example: | ||
{|class="wikitable" | {|class="wikitable" | ||
! Microscope type !! Area per HPF | ! Microscope type !! Area per HPF | ||
| Line 169: | Line 222: | ||
</gallery> | </gallery> | ||
:You can send micrographs to your senior, but it is technically difficult to keep the focus while moving the glass slide. | :You can send micrographs to your senior, but it is technically difficult to keep the focus while moving the glass slide. | ||
| − | + | <noinclude> | |
==Cytology== | ==Cytology== | ||
In cytology samples, or any sample with scattered cells rather than coherent tissue, also evaluate the following: | In cytology samples, or any sample with scattered cells rather than coherent tissue, also evaluate the following: | ||
| Line 175: | Line 228: | ||
*Background, mainly if it is clear or dirty | *Background, mainly if it is clear or dirty | ||
*Overall cellularity | *Overall cellularity | ||
| − | <noinclude> | + | {{further|Cytology}}</noinclude> |
| + | ==Consideration== | ||
| + | First, generally suspect the '''common conditions''' for the location at hand. A less common variant of a common condition is often still more likely than a rare condition, so generally call the latter only if it really fits the picture. | ||
| + | |||
| + | Whenever you consider a certain diagnosis, also consider whether it is one step '''better or worse'''. For example, when you consider a non-invasive but high-grade dysplasia, also consider both low-grade dysplasia and invasiveness. | ||
| + | </noinclude> | ||
{{General notes}} | {{General notes}} | ||
{{Bottom}} | {{Bottom}} | ||
</noinclude> | </noinclude> | ||
Latest revision as of 21:06, 11 April 2024
Author:
Mikael Häggström [note 1]
First, confirm that the identity of the sample evaluated is the same as that of the requisition form and/or other medical history.
Contents
Microscopy settings
_-_larger_text.png)
Generally the condenser is placed in its highest position or just slightly lower. At low magnification objectives (mainly 4x and 10x objectives), the opening of the condenser (or iris) diaphragm should be wide open. This corresponds to turning away or "lowering" the condenser on microscopes where the condenser apparatus can be turned to the side (and is shown as "without condenser" in images below). For high-dry (40x) and oil-immersion objectives (100x), the diaphragm should be closed slowly while looking at a sharply focused section until the level of illumination is just slightly reduced, in order to attain optimal contrast and resolution (and corresponds to "with condenser" in images below).[1]

Light microscopy with and without condenser. At low magnification, using a condenser may limit the field of view, and in such cases it is preferable to not use it. At high magnification, a condenser makes borders less marked, and is generally preferable in such cases.

An example of a situation where microscopy without condenser is preferable at high magnification is the evaluation of crystals (calcium pyrophosphate dihydrate crystal deposition disease pictured).

Looking without a condenser may also enhance basement membranes, such as negating an invasive carcinoma in this case.


Low magnification has a greater span of focus compared to high magnification, so it is normal to need to focus if you're increasing magnification. However, if you find that you need to change focus even if going from high to low magnification, try the following (if you can adjust the eye piece):
- Use high magnification and focus on a specimen using the main focus knob.
- Switch to low magnification, and focus using the eye piece adjustment.
If there's a constant visual artifact, even after you've cleaned the eye piece and objective lenses with lens tissue, try raising or lowering the condenser if you can, and the artifact may disappear out of focus.
Priority
Whenever you have more than one case, generally have an initial look at the requisition form and/or in the microscope at the most likely relevant area of each case, and prioritize the case(s) that likely need to be done first. Indications to prioritize case(s) are mainly:
- Clinical management of the patient highly benefits from a fast diagnosis.
- Being marked as a rush case.
- There's a significant probability that it will require further workup such as immunohistochemistry, especially when there is an impending deadline for ordering it.
- The optimal person to ask for advice may not be available later. Further information: Consultation
As part of initial triaging, also determine what tasks can be 'delegated to juniors or pathologist assistants.
For a pile of many cases of relatively low risk of a need to prioritize any one over another, such as gastrointestinal biopsies, a very quick glance at the forms and/or a naked eye look at the glass slides is generally sufficient.
Main steps
- Preferably, look up past medical history of the patient, mainly past cancers that could possibly appear in the current specimen.
- Try to pick up glass slides without touching the tissue area, as fingerprints may interfere with the evaluation.
- Look at each microscopy slide by plain eye, to plan the microscopy scanning so as to not miss peripheral fragments.
- Have a systematic direction of scanning through microscopy slides, such as from top left to bottom right as seen in the microscope. When the microscope makes what you see two-way mirrored, the starting position is with the objective pointing at the bottom right of the glass slide. You may center on findings on interest and evaluate them at higher magnification, and then resume the scanning

Example starting position of objective.

Example slide scanning movement.
.jpg)


Starting at top left in the view, aim to scan a strip that trajects a circular field of view approximately at the clock positions shown...

...When reaching the end of relevant material, set your eyes on any object at the edge of the strip that you just scanned...

...Move the field of view over so that the object is seen on the opposite side. The new strip to be scanned will now be juxtaposed to the one you previously scanned.


This scanning technique above makes sure that you don't miss any area, and also minimizes redundant scanning. The width or clock position that you scan in each field of view is not exact, as you may scan up to the entire width in cases where you think relevant findings will clearly present themselves even if only partially showing in the periphery of your view.
- Look in particular for whatever is requested or suspected on the requisition form or equivalent. For each type of condition, initially you will generally focus relatively more on high magnification features with high specificity, but you should still have a habit of looking at low magnification as well to get an idea of its pattern. In time, you will increasingly correlate diseases and conditions with their overall low magnification patterns - patterns that may require 1000 words to describe and thus cannot conveniently be part of written criteria, but will nevertheless allow you to make quicker and more accurate diagnoses, or at least clues thereof.
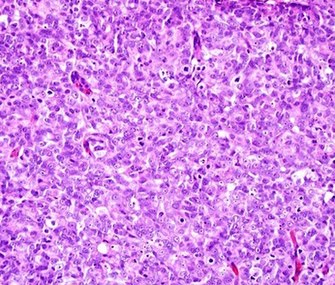
- When you find something suspicious, it is helpful at least in the beginning to evaluate them systematically by a low-to-high magnification approach (example below showing a basal-cell carcinoma):

Orientation (lowest magnification): In this case oriented by the skin surface (green). A lesion is seen (red) and its demarcation can be discerned (diffuse in this case)

Architectural pattern of any suspicious cells, in this case nests of cells (an overview of patterns will be given later in this chapter), as well as components of the intervening stroma.

Cellular arrangement, including crowding and polarity (common tendencies among cells at the border, such as positions of nuclei within cells, cell elongation or "palisading" in this case). Amount of mitoses can also be appreciated at this level.

Subcellular features (may need highest magnification)


- Complete the scanning even if you encounter a finding, as there may be additional findings as well. It is usually helpful to Google multiple images of the normal histology of the location you are looking at, and compare those to what you see, and focus on whatever features may deviate from the normal.
General patterns
Following are major patterns that often help in making a diagnosis.
Architectural patterns

Nests: islands of cells of similar type.

Acinar or tubular: Each acinus consists of cells that surround a lumen.

Trabecular, elongated (rod-shaped) groups of cells.

Papillary: Protuberances of epithelioid cells around fibrovascular cores.

Micropapillary: Papillary tufts without fibrovascular cores

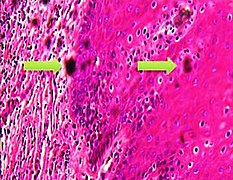
Fascicular: Generally the same cell type throughout, but some form band-like groups that are aligned in the same direction.

Woven or storiform: Elongated cells or nuclei wherein small bundles are aligned in an otherwise haphazard pattern.
Solid or "sheets": More or less the same cell type throughout, with no spaces between, and no other particular pattern.

Cribriform: Solid with multiple clear spaces.

Whorled: Multiple concentric objects, or spiral-shaped

Cartwheel pattern: Center points that radiate cells or connective tissue outward


.jpg)


_with_solid_sheets_of_cells_(crop).jpg)


Cellular patterns

Main staining types of the cytoplasm when using hematoxylin and eosin (H&E).

Hobnailing: smooth projections from an epithelial surface.


Nuclear patterns
When feasible, classify nuclei as follows:

Monomorphic when having relatively similar sizes and shapes.

Pleomorphic when having different sizes and shapes. This often correlates with an increased nucleus to cytoplasm ratio. These features generally favor malignancy in the evaluation of suspected malignancies.

Fine chromatin when inconspicuous (essentially only nucleoli seen in the nuclei), versus coarse chromatin.

Sometimes "heterochromatic" versus "euchromatic" nuclei are used, but this strictly refers to the molecular structure of DNA, so you may simply use fine versus coarse.

Granular "salt-and-pepper" chromatin.


- Patterns of nuclear disintegration

Other patterns

Hyaline usually refers to extracellular material that stains homogeneously pink on H&E stain (like the matrix of hyaline cartilage, pictured).

Example of hyaline material (in alveoli of lungs, indicating diffuse alveolar damage)

This is what pathologists also refer to as "glassy" (because hyaline cartilage looks like glass grossly).


Inflammation

Neutrophils generally confers a diagnosis of acute inflammation.

Plasma cells and lymphocytes generally confers a diagnosis of chronic inflammation if present in increased amount for the location.

However, disregard intravascular white blood cells.


Marking slides

To mark a microscopy slide, use an objective that gives you enough space underneath. Rest a finger on the stage, while holding the marker pen relatively close to its tip. Move the tip of the marker pen into the field of view but at least a few millimeters from the slide...

...Then slowly approach the slide while making sure that the tip remains in the location you want to mark. Be careful not to obscure findings of interest with the mark. If the slide is likely to undergo whole slide imaging, make the mark on the back and not on the coverslip (as it reduces the risk of erroneous focusing of the cameras).

You can generally remove marks from a microscopy slide by using alcohol. Hold the cover slip in place with two fingers while wiping from side to side, to avoid the risk of moving the coverslip. Don't press hard against the glass, as it may disrupt the tissue.


Measuring distances

You can use a regular transparent ruler for most purposes, since it is rarely necessary to specify distances as more exact than millimeters. It works best on low magnification.

Alternatively, mark the limits under microscopy, and then use a regular ruler to measure the dimensions. This works even if the distance exceeds the field of view, or spans more than one slide.
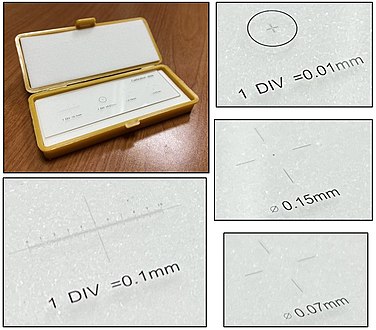
Rarely, sub-millimeter measurement is needed, in which case you may use a calibration slide, which is basically a translucent ruler with 0.1 mm line resolution or smaller, which may cost about $15 if none of your colleagues has one to lend, or the department can't provide one for you.

To measure distance with a calibration slide, put it on top of the tissue slide and switch focus between the two.


There are also eye pieces that show a ruler in the field of view, but make sure you match it with the correct objective and other settings to make the measurement valid. A calibration slide is more robust because of such sources of error.
Counts per mm2
There are multiple situations where a finding will be quantified in terms of amount per mm2. To make such calculations, you need to know the size of the area you see in the microscope. It is usually possible to look up what theoretically would be the area, but the most reliable way of knowing is to use a calibration slide to measure the diameter of your view. The area is then calculated as:
- Area in mm2 ≈ (diameter in mm2) x 0.79

Micrograph of a calibration slide, showing the diameter of the field of view.

On the imaged example, each square is 0.05 mm wide, and each line represents 0.01 mm, making the diameter of the field of view 0.55 mm in this case. Thus, you can calculate the area in mm2 by Googling:
- 0.55 x 0.55 x 0.79
- (equals approximately 0.24 mm2).
Generally count at least 10 fields of a high power view (or more if specifically instructed). You can keep the count in your head by repeating the total count and the order of the area you are looking at, such as:
- "Zero (instances) of one (field of view)"
- "One of two (as you see one instance as you've moved to the second field of view)"
- "Two of two" etc.
Subsequently, the count per mm2 is calculated as follows:
| Count per mm2 = | Total count |
| Number of fields x Area per field (in mm2) |
For example, if you reached "15 of 10", and the area of your field is 0.2 mm2, the count per mm2 can be calculated by Googling:
- 15/10/0.2
- = 7.5
Sometimes "high power field" (HPF) is used for area, but it has a substantially different area for different microscopes, for example:
| Microscope type | Area per HPF |
|---|---|
|
0.096 mm2 [2] |
| AO with 10x eyepiece | 0.12 mm2 [2] |
| Nikon Eclipse E400 with 10x eyepiece and 40x objective | 0.25 mm2 |
| Leitz Ortholux | 0.27 mm2 [2] |
| Leitz Diaplan | 0.31 mm2 [2] |
When your instructions are to count a specific number of HPFs, one HPF can be assumed to be 0.2 mm2.[3] If the view area in your microscope significantly differs from this area, calculate how many views you need to count as:
| Views = HPFs required x | 0.2 |
| Your microscope area (in mm2) |
For example, if your instruction is to count 10 HPFs and each view in your microscope shows 0.096 mm2, you should count in this many views:
| 10 x | 0.2 | ≈ 21 |
| 0.096 |
Subsequently, if your microscope area is significantly different from 0.2 mm2 and you need to state your result in terms of count/HPF, use:
| Count/HPF = Average count in your view x | 0.2 |
| Area of your view in mm2 |
For example, if you have counted an average of 10 cells (or other object of interest) in each of your views, and the area of your view is 0.096 mm2, then your count/HPF is:
| 10 x | 0.2 | ≈ 21 |
| 0.096 |
Artifacts
In microscopy, an artifact is an apparent structural detail that is caused by the processing of the specimen and is thus not a legitimate feature of the specimen. Major artifacts to account for include:
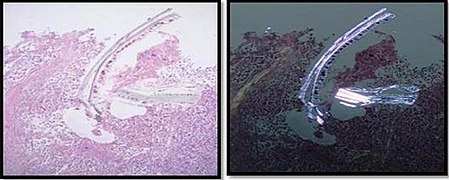
Cellulose contamination, here seen on H&E stain and polarized light, respectively. In contrast to foreign bodies that were truly in the specimen, contamination overlaps with or disrupts tissue more unnaturally.

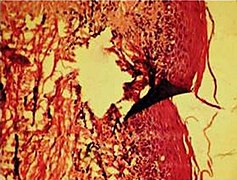
Cardiac muscle (bottom) with contamination from thyroid tissue (center).
Crush artifact from compression by forceps on the tissue sample.

Folding artifacts (white arrows) and a crush artifact (black arrow, with dark cytoplasmic staining and nuclear pleomorphism) from a needle.

More tearing artifacts, showing that they may be more circular than fusiform.
'Formalin pigment artifacts

Air bubble entrapment artifacts

Staining artifacts by residual wax, resulting in pale areas where cellular structures are not discernible.

A separation artifact in top image makes the tumor look incompletely excised, but the next microtomy level (bottom image) shows a surgical margin of connective tissue.


.jpg)
Differential diagnoses of artifacts are mainly:
- Foreign bodies. In contrast to contamination, these conform more naturally to the surrounding tissue.
- Organisms, to be particularly considered when there are multiple objects of the same size.
Order recuts from the same paraffin-embedded tissue if artifacts significantly impairs your diagnostic evaluation of the glass slide. However, artifacts caused by gross processing may affect recuts as well.
Micrography and telepathology
Unless you have more specific equipment for taking microscopic images and showing cases to remote colleagues, you can perform these tasks as follows:
- With a stationary computer, you can connect to a microscopy camera. For telepathology, you can start a videoconferencing session with your senior, then share the screen while showing a micrograph, or the live view so that you can move around.
- With a mobile phone:

To perform micrography with a smartphone, stabilize the smartphone over the eyepiece (preferably using both hands), about 3-5 cm away from it, and direct it on the bright circle on your phone display...

...and then slowly move the smartphone closer to the eyepiece, while adjusting both direction and location so as to keep the bright circle in the center of the display, until the camera is able to focus and you have a visible field that is large enough for evaluation, and then take your photos.


- You can send micrographs to your senior, but it is technically difficult to keep the focus while moving the glass slide.
Cytology
In cytology samples, or any sample with scattered cells rather than coherent tissue, also evaluate the following:
- Adequacy of specimen. Cells may be too few or too obscured by other material to make a proper diagnosis.
- Background, mainly if it is clear or dirty
- Overall cellularity
Further information: Cytology
Consideration
First, generally suspect the common conditions for the location at hand. A less common variant of a common condition is often still more likely than a rare condition, so generally call the latter only if it really fits the picture.
Whenever you consider a certain diagnosis, also consider whether it is one step better or worse. For example, when you consider a non-invasive but high-grade dysplasia, also consider both low-grade dysplasia and invasiveness.
|
Further reading: |
Notes
- ↑ For a full list of contributors, see article history. Creators of images are attributed at the image description pages, seen by clicking on the images. See Patholines:Authorship for details.
Main page
References
- ↑ Patrice F Spitalnik. Histology Laboratory Manual, Vagelos College of Physicians & Surgeons Columbia University. Retrieved on 2021-09-20.
- ↑ 2.0 2.1 2.2 2.3 . Infiltrating Ductal Carcinoma of the Breast (Carcinoma of No Special Type). Stanford University School of Medicine. Retrieved on 2019-10-02.
- ↑ Klimstra, David S.; Modlin, Irvin R.; Coppola, Domenico; Lloyd, Ricardo V.; Suster, Saul (2010). "The Pathologic Classification of Neuroendocrine Tumors ". Pancreas 39 (6): 707–712. doi:. ISSN 0885-3177.
- ↑ 4.0 4.1 4.2 Taqi, SyedAhmed; Sami, SyedAbdus; Sami, LateefBegum; Zaki, SyedAhmed (2018). "A review of artifacts in histopathology ". Journal of Oral and Maxillofacial Pathology 22 (2): 279. doi:. ISSN 0973-029X.
Image sources